Migrate Server
Table of Contents
- 1 Migrate Server
- 2 How to Migrate Server
- 3 An Introduction to Server Migration
- 4 Why should I think of a Server Migration?
- 5 Advantages of Migrating to Hostingraja
- 6 HostingRaja data migration service includes
- 7 Steps to Migrate Server in Windows (VPS)
- 8 Things to Check after Migration
- 9 Data Synchronization after Server Migration
- 10 Adding Email Accounts on the New Server
- 11 Configuring the email client
- 12 Creating Email Accounts in Plesk
- 13 Creating a Back-up of the Website Files
- 14 Test your website speed on the New Server
- 15 Switching the Nameservers
- 16 How to Migrate a Website Without a Downtime
Migrate Server is a comprehensive server migration service offered by HostingRaja. We understand the criticality of seamless server migration and the impact it can have on businesses and developers. With our Migrate Server service, we provide
a hassle-free solution to migrate your existing servers to our advanced hosting infrastructure with ease and efficiency.
How to Migrate Server
An Introduction to Server Migration
As the company progressively works on enhancing IT systems for greater efficiency and productivity, several questions arise regarding server migration, including options like powerful servers, exclusive servers, cloud hosting,
and server price considerations. In today’s IT landscape, server migration has become a crucial aspect of maintaining seamless operations.
The growth opportunity of the operation will be dependent on how you perform the server migration. Mainly the two focus points would be swiftness and efficiency. Here we will assist in understanding what a server migration is and
what are the elements included in the server migration process .
Why should I think of a Server Migration?
Server migrations may require to occur for several reasons. Organizations may migrate to:
- Take benefit of new technology or more suitable service, or assure that the operating system and the hardware beneath it remain up-to-date with recent technology.
- Move to Cloud hosting, for improved flexibility or scalability.
- To economize and decrease hosting and decrease CapEx.
- Replace aging infrastructure at the destiny of its lifecycle.
- To extend and spread hosting to help diminish load at a single point and gain high availability.
- Migrations should be managed with maximum care. You could drop hours of time, effort, and money into a migration-only to find yourself onto the wrong server solution with downtime and earnings loss. It carries significant
planning and forethought to migrate your data onto an optimized server that is good for you.
Advantages of Migrating to Hostingraja
- Better Performance – If you have a website which is loaded with a lot of contents, images, plugins or themes in this case your website will eat up a lot of memory or it overlad database. In this case the website performance
will reduce drastically moreover it will impact the user experience as well. Even after doing a proper clean up of the website the performance might not improve. It will be more difficult to improve the website performance
when the hardware is not upgradable.
In such cases we need to move the data from existing hardware setup to a large scale platform that gives complete freedom of space and performance for the business owners. When you choose us the overall performance of the website will be enhanced and
the website visitors will get faster response thus increasing the customer credibility with increased ROI. As per our experience, customers trying to migrate their website becomes a challenging task if they are unaware
of the technical know-how. Hence choosing a good provider is important focusing on the future requirements and adding the right setup for the website. - Better Control – Due to lack of control with many of the providers in the market, many of the customers had an annoying experience with those providers. However there are some providers who offer services as per the customer
needs. But being a business entity there shouldn’t be any compromises. When you choose HostingRaja you will have better control over the server. Moreover the technical experts are available 24/7 to give you the required
information. - Better Speed – Loading time is an important factor for any website user. Moreover website visitors stay at a web page only when it loads faster. A report suggests that 79% of customers who report dissatisfaction with the website
are less likely to buy from the website. If the website loads slow it can impact the conversions as well. Hence you need to make sure your website loads super fast. When you choose HostingRaja as your web hosting partner you will notice better loading time with Low Latency & High Speed Servers. - Better Scalability and Reliability – HostingRaja gives you better scalability and reliability according to your business needs. You can always scale your resources according to your website needs. You can select the required
setup according to your business needs and then increase it gradually when the number of users or content or plugins increases on the website.
HostingRaja servers are highly reliable and secured across India. The data centers used by HostingRaja are across India which makes the data highly secured and
you are given the restore facility whenever you require. HostingRaja is the only company in India who offers best support in regional languages with premier security.
HostingRaja data migration service includes
Data transfer from one cPanel to another cPanel
Troubleshooting the errors and monitoring the data transfer
Conduction scan before and after the migration
Modifying DNS records
Steps to Migrate Server in Windows (VPS)
Step 1: You can start the migration from the Plesk administration panel and you will be able to see Tools & Settings. In the tools and settings option you will see the option Transfer Manager and then you need to select
Start a New Migration.
Through this process, you can always go back to the page from where it was left or you can even start a new migration process. Plesk migrator contains the hints for controls that are related to the migration.
Step 2: In the Next step specify the administrator for Windows server account names that are for the source and destination servers. Once it is done you can go to the next step by clicking on the Prepare Migration:
Step 3: In this step the Plesk Migrator will get connected to the source server. Once it is connected it will do some of the initial checks and hence fetch the information about the hosting from the source.
Step 4: In this step you need to select the objects for migration. In this case on the Add subscriptions tab you need to choose the subscriptions for the migration and then you need to specify what type data needs to be migrated,
which can be web, mail or the database.
When the list is ready of the data to be migrated click on Migrate to Proceed. In case of Windows VPS, Server Plesk will run the pre-migration
checks for detecting the potential issues if there is any issue and display the report
Step 5: It is very important to check the messages from the pre-migration checker. Each message is very important, some of the messages might indicate the issues blocking the process of transfer. You can even solve the problems
by using the instructions which are provided in the message. You can refresh the pre-migration checking status and then click on the migration again.
Step 6: When the pre-migration process is done you need to click on the Start Migration for starting the migration. The process of migration can take several hours depending on the amount of data to be transferred. For a good
amount of data to be transferred it is advised to launch the migration process at night. For every subscription, you can check the status manually.
Things to Check after Migration
After the migration is completed you need to check and verify if the transferred data i.e websites, emails or databases are there on the destination server. You can perform this step either manually or automatically.
1. Automated post-check after Migration
When the migration is done using GUI (Graphical User Interface), you need to check the operability of the services after migration, here we need to check if the checkbox is enabled. If the migration is processed through a command
line a CLI (Command Line Interface) should run after the migration is finished.
2. Manual post-check after Migration
You need to add the records to the host file on the destination server and then verify the websites locally.
Data Synchronization after Server Migration
You must remember that all the services operate on the source server during the process of migration. You might also take time for verifying everything before going online with the destination server. There are chances that the
migrated content can go out of sync after some time.
For solving this type of issue, for each subscription from the Plesk, you can easily synchronize the migrated data. Hence there is no need of repeating the migration process again. This process can be done web, database , and emails separately. This can also be done for all the domains together. When this process is completed you will be able to see the re-sync option on the Overview tab.
Adding Email Accounts on the New Server
Free email accounts might not give your business a competitive edge as they dont look professional. Emails provided by Google and Yahoo are good for personal
emails but hosted emails are the one which is used by most of the businesses. If you are having a domain name and hosting space, you
might consider running emails that point back to the main website. If you are having email addresses like [email protected] or
[email protected] then it would not look spammy.
Here we will discuss the steps to create your own personal emails and then point them back to the preferred email client.
Step 1: Log in to the cPanel account
cPanel offers the best interface for automating the linux commands. For accessing the cPanel, you need to visit the URL by replacing ‘example.com’
with the main name which is associated with the hosting account. For example www.example.com/cPanel. Here you will be asked to enter the username and password.

We need to make sure that the details entered are correct and then click on the ‘Log in’ to proceed. Once the details are entered correctly you will see the dashboard of the cPanel.
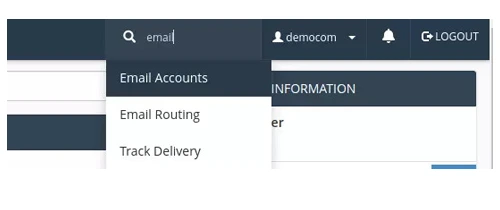
You need to Type the ‘email’ in the search box and then click on email accounts on the drop down box.
Step 2: You need to enter the correct details and then click on the ’Create Account’. In this case we typed ‘testtest’ as the username. You need to keep these details safe, we will require them when configuring an email client.

Configuring the email client
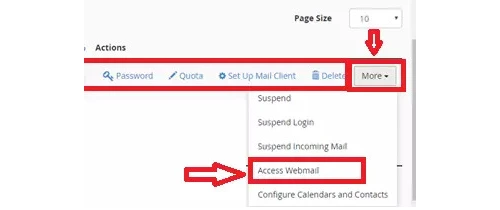
Emails can be managed either directly or from cPanel or by setting up an email client. If you want to manage it directly you need to locate the email account on the cPanel and then we need to click on the ‘More’ link and then select
the ‘Access Webmail’. Once it is done you can choose the webmail client from the list which appears on the next screen.
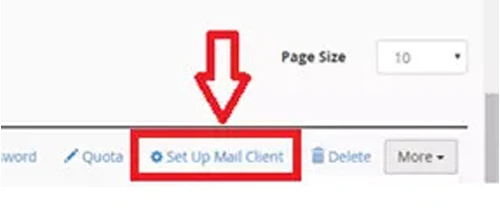
If configuration of an email client is required, then click on the ‘Set up Mail client’
Navigating to the Mail clients
Here in this part we are more interested in the incoming and the outgoing servers and ports.
Providing Access to the New Hosting Provider
Creating Email Accounts in Plesk
Step 1: You need to go to the mail.
Step 2: You need to click on create email address.
Step 3: You need to type the left part of the email address before @ symbol. If there are several domains on the account, then you need to select the domain name with which the email address will be created.
Step 4: Specify an external email address. It will be used to reset your password if you lose access to your primary email address.
Creating a Back-up of the Website Files
If you are using cPanel/Plesk panel you would be required to give the hosting panel access to the new hosting provider so that the current provider can take the data from old server to new
Test your website speed on the New Server
There are many tools to check the speed of the website on the new server. One of the tools is
On this tool we checked HostingRaja website. We got results which is displayed below:
Switching the Nameservers
To change the DNS on the Domain name, following steps should be followed:
- Log in to the Account
- Under the menu option Domains, we need to click on My Domains
- Now you need to click on the domain name you need to work with.
- Click on the DNS Server Settings or select the DNS Server Settings from the Manage Domain drop-down list.
Note: If the domain name is registered with HostingRaja we will change the DNS/name-servers from our end. If the domain name is registered from some other vendor you will have to update the DNS/name server in the control panel.
How to Migrate a Website Without a Downtime
Sometimes moving a website from one server to another can be a complex task and in many cases downtime may occur. Hence we will discuss the steps by which we can avoid downtime while migrating the website:
- Don’t Cancel the Host before Moving the Data – One of the most common mistakes done by website owners is that they discontinue the services from the old service providers before transferring the files to the new server provider.
In this case the website owner may not only experience downtime but can also experience the complete loss of files and database from the time the cancellation is requested. - Download the Backup Files – You can login to the cPanel and then obtain the compressed backups of the website files and the database information.
For the people who are moving to a new host they should ensure that both the hosting companies should have same web based administration
Conclusion : Here we had in-depth discussion on the process of server migration. If you want to migrate to HostingRaja server from any other web hosting provider you can contact our sales representatives. They will assist you
in choosing the best plan for your website. Once you have purchased the right plan from us you can migrate to our servers. Our engineers are always available for your assistance.
-

Dhanasekar Mani
Founder Of HostingRajaDhanasekar Mani, a seasoned SEO Specialist and Entrepreneur, brings over 23 years of expertise in software development. As the esteemed
founder of HostingRaja and Webbazaar, he has played a pivotal role in shaping these ventures. He contributed to pioneering patented technologies, solidifying his impactful presence in the tech industry.